Monitor the connection to your Internet Service Provider (ISP)

    No Comments

    In Australia we are forced to use the NBN as the Internet Carrier. They have a specification that the service is functioning as intended if there are less than 4 outages in a given calendar day. This python script will provide you with timestamped log file when the service is operating and when it is not. You can then pass that to your ISP as proof of the outages.

    You can also refer your ISP to this page so they can see how you are knowing when the service is working and when it’s not working.

    The script

    import requests
    import time
    from datetime import datetime
    
    # Function to perform the GET request and log the result
    def log_request(url):
        # Define the headers pointing to a page that explains this script
        site = "https://code.trev.id.au"
        page = "/monitor-the-connection-to-your-internet-service-provider-isp/"
        headers = {
            'User-Agent': 'Network connection logging script',
            'Referer': site + page
        }
    
        try:
            # Include the headers in the request
            response = requests.get(url, headers=headers)
            # Check if the response status code is 200 (OK)
            if response.status_code == 200:
                log_message = (f"{datetime.utcnow()}"
                               f" UTC - {datetime.now()}"
                               f" LOCAL - {url} - Success\n")
            else:
                log_message = (f"{datetime.utcnow()}"
                               f" UTC - {datetime.now()}"
                               f" LOCAL - {url}"
                               f" - Failed with status code"
                               f" {response.status_code}\n")
        except Exception as e:
            log_message = (f"{datetime.utcnow()}"
                           f" UTC - {datetime.now()}"
                           f" LOCAL - {url} - Error: {str(e)}\n")
    
        # Generate the log filename based on the current date
        log_filename = datetime.now().strftime("log-%Y-%m-%d.txt")
    
        # Log the message to the dynamically named file
        with open(log_filename, "a") as log_file:
            log_file.write(log_message)
    
    # URL to be requested. This should be something small
    # on your ISP's web site. Not worth downloading anything of size.
    url = "https://www.yourisp.com/small-file-to-test-with"
    
    # Main loop to perform the request every 15 seconds
    while True:
        log_request(url)
        time.sleep(15)


    What you need

    You should run this script on something that has Python installed and is always on. You should have easy access to it via SSH so you can look at the log files. I use a Raspberry Pi.

    The device running the script should have it’s timezone set to your local timezone.

    Have the ‘requests’ library installed or if not, use

    pip install requests

    Modify the script for your use

    Personalise the site and page variables. NB I broke them apart to avoid having lines of code wrapped when showing the code on this page. You can modify this to put it all together in the headers dictionary to reduce the number of lines of code.

    Change the url variable near the bottom of the script to a url that points to something small to get from your ISP’s web site.

    What does the script do

    A while true loop sits at the bottom of the script that loops the application to log_request function and then sleep for 15 seconds.

    The log_request(url) is the main function that does the work in this application. It initially sets the header variables. Then in a try block, it calls requests.get function passing the url and the headers. It checks the return value looking for a status code of 200 which is a success code.

    If a status code of 200 is returned it logs a line in the log file with UTC time, local time, the url and the result word “Success”.

    If it’s not a status code of 200, a log entry is made with the UTC and Local times, the url and the response status message.

    Should an exeption occur with the request in the try block, a log entry is made with UTC and Local times, the url and the error message. Note this is usually how a failed connection is picked up rather than a different status code message. The error text if not connected is similar to:

    Error: HTTPSConnectionPool(host=’www.internode.on.net’, port=443): Max retries exceeded with url: /images/logo/icon-internode.svg (Caused by NewConnectionError(‘: Failed to establish a new connection: [Errno -3] Temporary failure in name resolution’))

    Next, the log file name is generated with todays data as part of the filename which ensures only the log entries are for the calendar day and they can be easlity identified.

    Write the log entry to the file using the with methodology so the file is closed once the write is done.

    Categories: monitor, network, python

    You don’t have permission to access /awstats/awstats.pl on this server

    1 Comment
    AWStats main screen

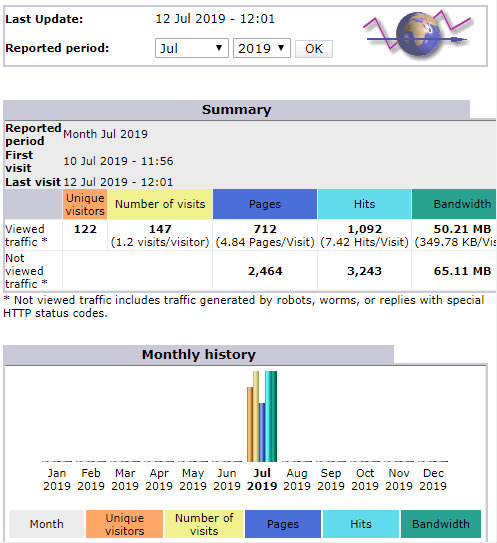
    Installing AWStats 7 via yum on CentOS 7 with Apache 2.4 and resolving the error “You don’t have permission to access /awstats/awstats.pl on this server

    Step 1: Minimum prerequisites

    yum install epel-release
    yum install httpd
    systemctl enable httpd
    systemctl start httpd

    Step 2: Install AWStats

    The following (at the time of this post) installed version 7.7 (build 20180105)

    yum install awstats

    Step 3: Configure apache configuration file for AWStats

    When AWStats is installed onto CentOS via yum it puts an awstats.conf file in /etc/httpd/conf.d folder. Need to make a couple of changes to this to avoid getting a “You don’t have permission to access /awstats/awstats.pl on this server” error and to be able to access AWStats over the network.

    # Alias /awstatsclasses "/usr/share/awstats/wwwroot/classes/"
    # Alias /awstatscss "/usr/share/awstats/wwwroot/css/"
    # Alias /awstatsicons "/usr/share/awstats/wwwroot/icon/"
    # ScriptAlias /awstats/ "/usr/share/awstats/wwwroot/cgi-bin/"
    ScriptAlias /awstats/ "/var/www/cgi-bin/"
    
    <Directory "/usr/share/awstats/wwwroot">
         Options None
         AllowOverride None
         <IfModule mod_authz_core.c>
             # Apache 2.4
             Require host 192.168.0.0/24
         </IfModule>
         <IfModule !mod_authz_core.c>
             # Apache 2.2
             Order allow,deny
             Allow from 192.168.0.0/24
             Allow from ::1
         </IfModule>
    </Directory>
    
    <IfModule mod_env.c>
         SetEnv PERL5LIB /usr/share/awstats/lib:/usr/share/awstats/plugins
    </IfModule> 

    First, comment out the first four lines with a # as the first character of each line. This will break it, but we’ll fix it soon.

    Add the new ScriptAlias line.

    Next add the “Require host” line (or multiple lines) to suit your needs. Just in case your using Apache 2.2 still, add the “Allow from” line too.

    The last block may not format nicely in a browser, but it should be a single line of text between the open and close IfModule tags. (It may wrap the text in your browser, so take care).

    Step 4: Copy some files to make it work

    In step 3 we commented out the first few lines, however we still need those parts served by apache. We’re going to copy them to within /var/www which overcomes the permission problem.

    Create the following directories in /var/www/html (or the document root of your web server)

    mkdir /var/www/html/awstatsclasses
    mkdir /var/www/html/awstatscss
    mkdir /var/www/html/awstatsicons

    Now copy the files to the newly created folders plus the pearl scripts to the cgi-bin folder

    cd /var/www/html
    cp -r /usr/share/awstats/wwwroot/classes/* awstatsclasses/
    cp -r /usr/share/awstats/wwwroot/css/* awstatscss/
    cp -r /usr/share/awstats/wwwroot/icon/* awstatsicons/
    cp -r /usr/share/awstats/wwwroot/cgi-bin/* /var/www/cgi-bin/

    Step 5: Restart apache http server

    systemctl restart httpd

    Step 6: Create a post yum update script

    The challenge with a work around is updating with yum, the updates don’t carry over. I’ve always handled this by using a post yum update script that I run after each time I do a yum update. It shouldn’t matter if the particular application is not updated, it’s just a good habit.

    Actions to complete after a yum update.

    #!/bin/bash
    /usr/bin/cp -r /usr/share/awstats/wwwroot/classes/* /var/www/html/public/awstatsclasses/
    /usr/bin/cp -r /usr/share/awstats/wwwroot/css/* /var/www/html/public/awstatscss/
    /usr/bin/cp -r /usr/share/awstats/wwwroot/icon/* /var/www/html/public/awstatsicons/
    /usr/bin/cp -r /usr/share/awstats/wwwroot/cgi-bin/* /var/www/cgi-bin/
    chown -R /var/www/html
    chown -R /var/cgi-bin

    Caution of line wrapping with the above! After the #!/bin/bash it’s 4 lines beginning with /usr/bin.

    Change ownership to apache for the folders created and files just copied.

    chown -R /var/www/html
    chown -R /var/cgi-bin

    Step 7: Configure AWStats

    The following is very high level to get you going to test the above. There are quite a few resources already on the Internet that provide good detail on how to configure AWStats including modifying logs and multiple domain systems.

    An initial configuration will have been created in /etc/awstats by the installer based on the host name of your sever with a name something like awstats.yourdomain.com.conf. Open it in your favorite text editor and validate it’s configuration settings.

    Now run the update utility to generate the data for the AWStats pagees using:

    perl /usr/share/awstats/wwwroot/cgi-bin/awstats.pl -config=web.iotsd.io -update

    Step 8: View in web browser

    If all went well, you will now be able to view your data via a web browser by visiting:

    http://yourdomain.com/awstats/awstats.pl?config=yourdomain.com

    CentOS 7 add swap

    Adding swap to a CentOS 7 AWS virtual machine

    This is the steps for adding swap space to an CentOS 7 server.

    dd if=/dev/zero of=/swapfile count=2048 bs=1MiB
    chmod 600 /swapfile
    chown root. /swapfile
    mkswap /swapfile
    swapon /swapfile
    echo "/swapfile swap swap sw 0 0" >> /etc/fstab

    Check to make sure it created correctly

    swapon -s

    That’s it

    This note was written testing against the following image:

    uname -a: Linux s17.iotau.io 3.10.0-862.11.6.el7.x86_64 #1 SMP Tue Aug 14 21:49:04 UTC 2018 x86_64 x86_64 x86_64 GNU/Linux

    Categories: centos Tags: Tags: , ,

    Centos 7 remove MariaDB and replace with MySQL

    Why

    A number of reasons, but the one that was the trigger for me was:

    MariaDB does not have JSON data type

    MySQL version 5.7 does have JSON data type.

    System info

    The server I tested this process on has the following details:

    • uname -a: Linux s14.iotau.io 3.10.0-862.3.3.el7.x86_64 #1 SMP Fri Jun 15 04:15:27 UTC 2018 x86_64 x86_64 x86_64 GNU/Linux
    • mysql –version: Ver 15.1 Distrib 5.5.56-MariaDB, for Linux (x86_64) using readline 5.1
    • postconf -d | grep mail_version: mail_version = 2.10.1 milter_macro_v = $mail_name $mail_version (why relevant will see later)
    • yum list installed | grep phpMyAdmin: phpMyAdmin.noarch 4.8.2-1.el7.remi @remi

    Important

    This process removes all traces of MariaDB including removes any databases and users. You must back them up before you start.

    Postfix issue

    I don’t believe it to be a big drama at least for me, however postfix is dependent on a single library that is part of the MariaDB installation. Removing MariaDB using yum will also remove postfix which this document works around. We just need to make a copy of /usr/lib64/libmysqlclient.so.18 and put it out of the way for now so we can put it back later.

    The one issue I can see is postfix will no longer automatically update with yum update due to what it thinks is a missing dependency.

    Perl-DBD-MySQL issue

    I have not checked what perl-DBD-MySQL is dependent on within the MariaDB code. I don’t use Perl (at the moment).

    Remove MariaDB

    Have you backed up your databases and recorded user/password for each?

    Have you made a copy of /usr/lib64/libmysqlclient.so.18?

    Yes to both, your ready to start.

    systemctl stop mariadb.service
    systemctl disable mariadb.service
    systemctl stop postfix

    Check that you backed up your data. Good idea to restore the databases to a local mysql or mariadb server on your laptop.

    NOTE: Next step removes for dependencies: perl-DBD-MySQL and postfix. Skip to alternate step is not ok:

    yum remove mariadb.x86_64 mariadb-libs.x86_64 mariadb-server.x86_64

    OR to keep dependencies for now

    rpm -e --nodeps "mariadb-libs-5.5.56-2.el7.x86_64"
    rpm -e --nodeps "mariadb-server-5.5.56-2.el7.x86_64"
    # Expect to see "warning: /var/log/mariadb/mariadb.log saved as /var/log/mariadb/mariadb.log.rpmsave"
    rpm -e --nodeps "mariadb-5.5.56-2.el7.x86_64"

    and continue post package removal

    rm -f /var/log/mariadb
    rm -f /var/log/mariadb/mariadb.log.rpmsave
    rm -rf /var/lib/mysql
    rm -rf /usr/lib64/mysql
    rm -rf /usr/share/mysql

    Remove phpMyAdmin

    yum remove phpMyAdmin.noarch

    Install MySQL 5.7

    Note, at time of writing, MySQL 8 still had issues with tools like phpMyAdmin and the change in it’s password mechanisms hence sticking to version 5.7 for now.

    yum localinstall https://dev.mysql.com/get/mysql57-community-release-el7-11.noarch.rpm
    yum install mysql-community-server

    This will install the following packages:

    • mysql-community-server x86_64 5.7.23-1.el7 mysql57-community
    • mysql-community-client x86_64 5.7.23-1.el7 mysql57-community
    • mysql-community-common x86_64 5.7.23-1.el7 mysql57-community
    • mysql-community-libs  x86_64 5.7.23-1.el7 mysql57-community

    Now start and enable the service:

    systemctl start mysqld.service
    systemctl enable mysqld.service

    Get the temporary root password

    grep 'A temporary password is generated for root@localhost' /var/log/mysqld.log |tail -1

    The password is at the very end of the line:

    2018-08-20T07:53:40.590219Z 1 [Note] A temporary password is generated for root@localhost: e88,Jtm&*n;>

    Secure the server

    mysql_secure_installation

    Set a new root password – must be at least 8 chars, have a number, an upper case letter, a lower case letter and a special character eg _ or # or other.

    After repeating the password, it will ask you if you want to change the password, say N because it’s already changed.

    Then four y’s to continue (unless you want something different)

    Now open /etc/my.cnf and at the bottom of the file add:

    #validate-password=FORCE_PLUS_PERMANENT
    #validate_password_length=10
    #validate_password_mixed_case_count=1
    #validate_password_number_count=1
    #validate_password_policy=MEDIUM

    The above are the default setting for password checking. To change any, un-comment and change the value. I don’t agree with the other method of removing the plugin all together.

    Once you have configured your password checking, run:

    systemctl restart mysqld.service

    Install phpMyAdmin

    rpm -Uvh https://dl.fedoraproject.org/pub/epel/epel-release-latest-7.noarch.rpm
    yum -y install phpmyadmin

    Now configure phpMyAdmin so you can access it but also change the url to access it so it’s not attacked.

    Open /etc/httpd/conf.d/phpMyAdmin.conf

    At the top you will see:

    Alias /phpMyAdmin /usr/share/phpMyAdmin
    Alias /phpmyadmin /usr/share/phpMyAdmin

    Change the two bolded phpMyAdmin’s to something different. As an example change to:

    Alias /fredsqladmin /usr/share/phpMyAdmin
    Alias /fredSqlAdmin /usr/share/phpMyAdmin

    The url to access phpMyAdmin will be https://your.server.com/fredsqladmin or https://your.server.com/fredSqlAdmin

    Next part is giving access from the internet. I have a fixed ip address so I allow my ip address only which means a person needs to know the address plus be on my ip address plus know the password. A good level of security. However if your ip address changes a lot or want to be able to access from multiple places you can change to allow all.

    First option – fixed ip.

    Google ‘what is my ip’ to get your ip address.

    Two blocks identical:

    <IfModule mod_authz_core.c>
      # Apache 2.4
      Require ip 127.0.0.1
      Require ip ::1
    </IfModule>
    <IfModule !mod_authz_core.c>
      # Apache 2.2
      Order Deny,Allow
      Deny from All
      Allow from 127.0.0.1
      Allow from ::1
    </IfModule>

    Add below the ‘Allow from ::1’:

    Allow from 192.168.0.24

    and ‘Require ip ::1’:

    Require ip 192.168.0.24

    Changing the ip address to your ip address. Note you can add multiple ip addresses on separate lines.

    Second option – allow from any address:

    Change the two blocks

    <IfModule mod_authz_core.c>
    # Apache 2.4
    #Require ip 127.0.0.1
    #Require ip ::1
    Require all granted
    </IfModule>
    <IfModule !mod_authz_core.c>
    # Apache 2.2
    Order Deny,Allow
    Deny from All
    Allow from 127.0.0.1
    Allow from ::1
    </IfModule>

    to

    <IfModule mod_authz_core.c>
      # Apache 2.4
      #Require ip 127.0.0.1
      #Require ip ::1
      Require all granted
    </IfModule>
    <IfModule !mod_authz_core.c>
      # Apache 2.2
      Order Deny,Allow
      Deny from All
      #Allow from 127.0.0.1
      #Allow from ::1
      Allow from all
    </IfModule>

    Restart apache using

    apachectl restart

    Test phpMyAdmin by going to your phpMyAdmin URL.

    Fix postfix.

    Postfix’s is unhappy producing the following errors because it’s missing the libmysqlclient.so.18 library:

    Aug 20 18:18:43 dovetail.iotsd.io aliasesdb[32408]: /usr/sbin/postconf: error while loading shared libraries: libmysqlclient.so.18: cannot open shared object file: No such file or directory
    Aug 20 18:18:43 dovetail.iotsd.io aliasesdb[32408]: /usr/bin/newaliases: error while loading shared libraries: libmysqlclient.so.18: cannot open shared object file: No such file or directory
    Aug 20 18:18:43 dovetail.iotsd.io postfix[32413]: /usr/sbin/postfix: error while loading shared libraries: libmysqlclient.so.18: cannot open shared object file: No such file or directory

    It expects to find /usr/lib64/libmysqlclient.so.18 so copy it from where you saved your copy.

    Restart postfix with:

    systemctl restart postfix

    As suggested earlier, postfix updates are likely to be problems with automatic yum updates so we tell yum to not update postfix by opening /etc/yum.conf and adding:

    exclude=postfix* perl-DBD-MySQL*

    I follow the instructions at https://www.netadmintools.com/art491.html to update my postfix.

    You now have a CentOS 7 server with MySQL and postfix still works.